Projects and Libraries
Project Explorer
Functionality
The Project Explorer displays content in a hierarchical tree structure, showcasing the call hierarchy among VIs within a program. By right-clicking on a sub-VI's icon and selecting "Show VI Hierarchy" or by accessing the VI's menu under "View -> VI Hierarchy", you can see which upper-level VIs call the selected VI and which sub-VIs it calls in turn. However, compared to the "VI Hierarchy" window, the organization of items in the Project Explorer can be adjusted by the developer, allowing for a more rational and orderly arrangement.
In the "Files" tab of the Project Explorer, you can directly manage the storage location of files on the disk, avoiding the need to open the file browser provided by the operating system.
The Project Explorer also integrates source code management features, eliminating the need for separate source code management tool interfaces. Source code management tools, essential for large-scale software development, track each modification to the code. These tools support the development of different versions of the same software and simplify the process for multiple developers to work on the same codebase concurrently.
Hierarchical Structure in Projects
Below is a screenshot of the Project Explorer. It uses a tree structure to represent all VIs, various components, and file configurations in the project, and can also show their interrelationships.
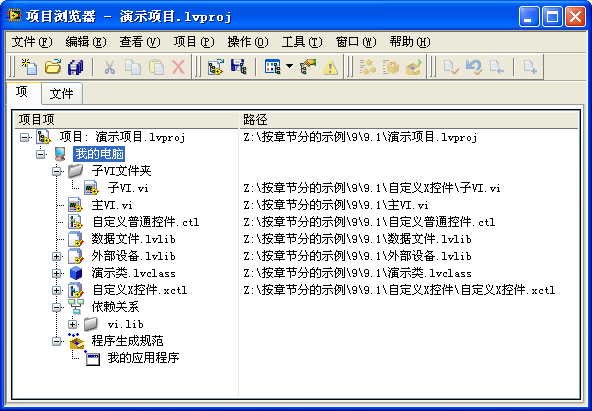
The tree structure at the top level represents the name of the project. A LabVIEW project is saved as a text file with a .lvproj extension. If you open this file with a text editor, you'll find it uses XML format to document the files included in the project and its properties.
The second level shows the target machine for project execution. If only the standard desktop version of LabVIEW is installed on the computer, you'll see only one target listed as "My Computer". LabVIEW also runs on various hardware platforms, such as PDAs, embedded devices, and FPGAs. If LabVIEW versions targeting these platforms, like LabVIEW RT or LabVIEW FPGA, are installed, those corresponding target devices will also appear at this level, as demonstrated in the image below.
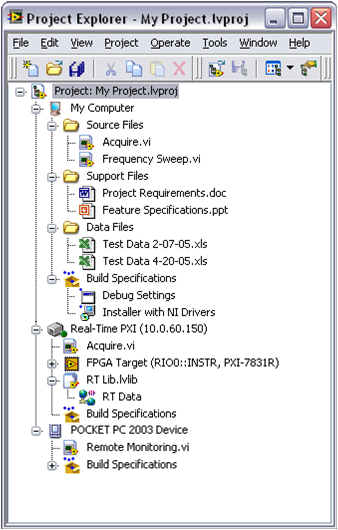
At the third level, besides "Dependencies" and "Build Specifications", you find all the files and folders utilized in the project. Users have the option to add virtual folders to organize the file structure according to their preferences. Besides VI (.vi) and control (.ctl) files, a LabVIEW project often includes VI libraries (.lvlib), LV classes (.lvclass), Xcontrols (.xctl), etc. The function and usage of these files will be discussed in detail in later chapters.
"Dependencies" displays those files that, even though not appearing in the project itself, are called by VIs within the project. These dependent files are mainly those that come with LabVIEW. If the dependent files are not LabVIEW's own (e.g., a sub-VI located outside of LabVIEW's path), then when deploying the project, it's crucial to ensure that these dependent files will be available on the user's computer. Otherwise, the project will not run properly on the user's machine.
Before LabVIEW 8.0, to build VI source files into executable files, the "APP Builder" tool found under the Tools menu was used. This tool has since been integrated into the Project Explorer. The "Build Specifications" item under the target machine includes information for configuring source code into executables (EXEs), dynamic link libraries (DLLs), etc.
Also, before LabVIEW 8.0, options for saving VI, such as adding a password, removing the front panel or block diagram, and other running-related options like disabling debugging or auto pop-up of error dialogs, were all consolidated into "Build Specifications".
File Structure
A large project usually consists of numerous files. To facilitate easier file access, it's common practice to group related files together. In the Project Explorer, virtual folders can be created to place files of the same type within the same folder. Furthermore, these virtual folders are capable of nesting.
Virtual folders in the Project Explorer can be linked to an actual folder on the disk. Initially, create a virtual folder, then right-click on this newly created virtual folder and select "Convert to Auto-Populating Folder", followed by choosing a real folder that it should correspond to from the pop-up menu. This action synchronizes the project folder with the selected real folder. Modifications made to VIs within this folder in the Project Explorer will also be reflected in the corresponding folder on the disk, and vice versa.
The path of a virtual folder in the Project Explorer can differ from the actual path of a folder on the disk. Files from different locations on the disk can be placed within the same virtual folder in the project; conversely, files from a single path can be distributed across different virtual folders. To display the real paths of each file in the project, select "Project -> Show Item Paths" from the menu in the Project Explorer window.
Viewing Projects by Physical File Structure
When creating a new, similar project or during version backups, programs often undergo copy operations. This process can lead to incorrect linking of sub-VIs. For instance, a sub-VI that should be from the Project One folder might accidentally be linked to a same-named sub-VI in the Project Two folder. To resolve such errors, one can enable the display of file paths to examine the real paths of each file and then correct those that are incorrectly linked.
It becomes cumbersome to individually check the real path of each file when a project contains numerous files. At such times, viewing the files according to their physical structure in the project can help verify the correctness of each file's path. By entering the "Files" tab, you see the files organized by their real paths in the project. By checking here to see if any unexpected folders appear, you can determine whether there are incorrect links. For example, in the project depicted below, all files should reside within the "Project One" folder. The appearance of "Project Two" in the project indicates there is definitely a linking error somewhere.
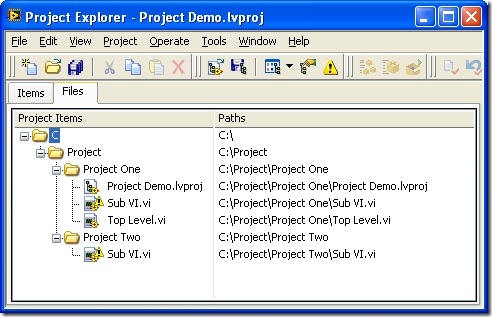
If the paths where some files are stored are not appropriate and need adjustment, you can directly rearrange them within the Project Explorer without needing to open the file explorer. In the "Files" tab, you can change their paths by simply dragging the files to the desired locations.
Source Code Management
For large-scale projects involving multiple developers, source code management is essential. Its main functions include backing up the source code, controlling versions, merging source code, etc. While LabVIEW itself doesn't offer source code management capabilities, it can easily integrate with common source code management tools (such as Perforce, Visual SourceSafe, etc.) to achieve these functionalities.
Taking Perforce as an example, if you have the Perforce client software installed on your computer, you can select Perforce as the source code control tool in LabVIEW's options dialog box under the "Source Code Control" tab, as illustrated below.
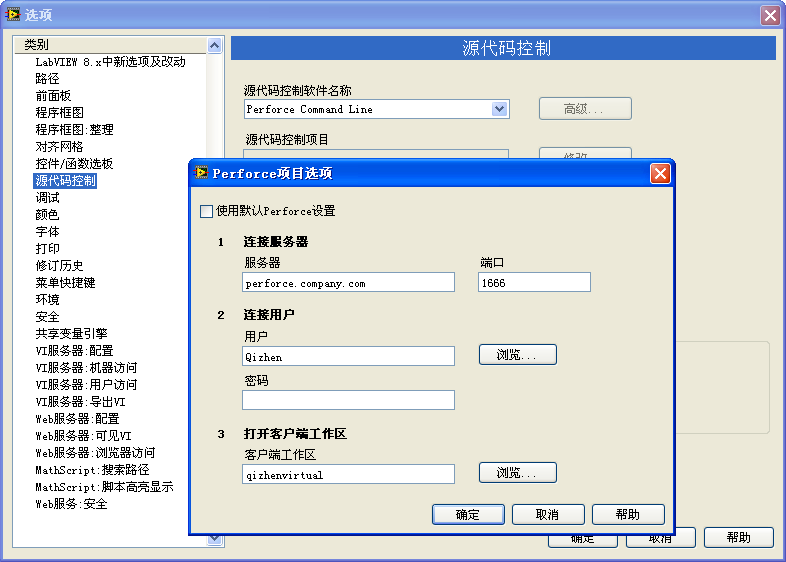
The configurations made in this options page apply globally to all LabVIEW projects. If a specific project requires unique settings, you can also customize the project's source code control settings in its property dialog box:
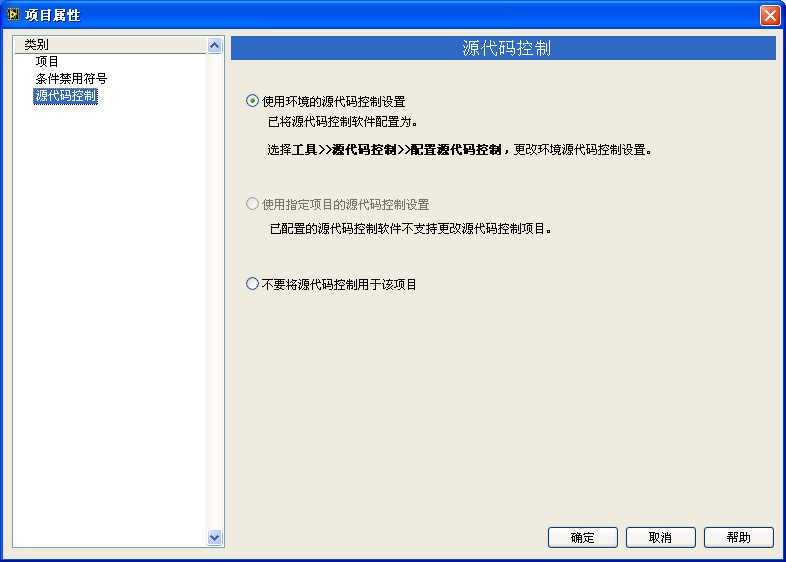
After configuring the source code control tool, you can use source code control features directly within LabVIEW's Project Explorer. Now, when opening a LabVIEW project, you will notice additional small squares on the file icons, some marked with a red tick, indicating different file statuses. Files that are stored on the source code control server show a small square; files that have been checked out, meaning they can be modified locally, are marked with a red indicator:
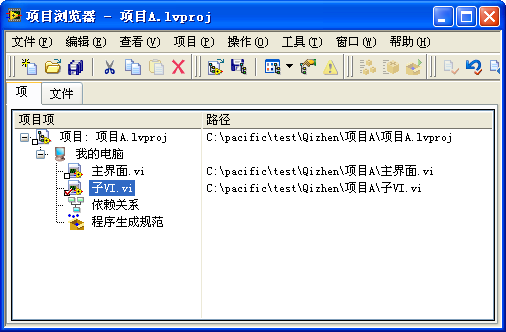
Developers can manage project files using the relevant buttons on the Project Explorer toolbar or through the right-click context menu within the Project Explorer. For instance, actions such as checking out from the server or uploading new versions to the server can be performed.
Comparing and Merging VIs
Source code control enables the documentation of a VI's different versions throughout its development. This feature allows developers to revert to any previous version as needed. They can compare the current version of a VI with its predecessor to assess the correctness of recent changes. If the recent changes prove to be incorrect, it's possible to discard the current version in favor of a more stable previous version.
In the Project Explorer, right-clicking a VI and selecting "Show Differences" allows for the comparison of the current version of the VI with its previous version. This option won't be available on computers without source code control tools installed. Alternatively, going to "Tools -> Compare -> Compare VIs" from the LabVIEW menu also facilitates the comparison between two VIs:
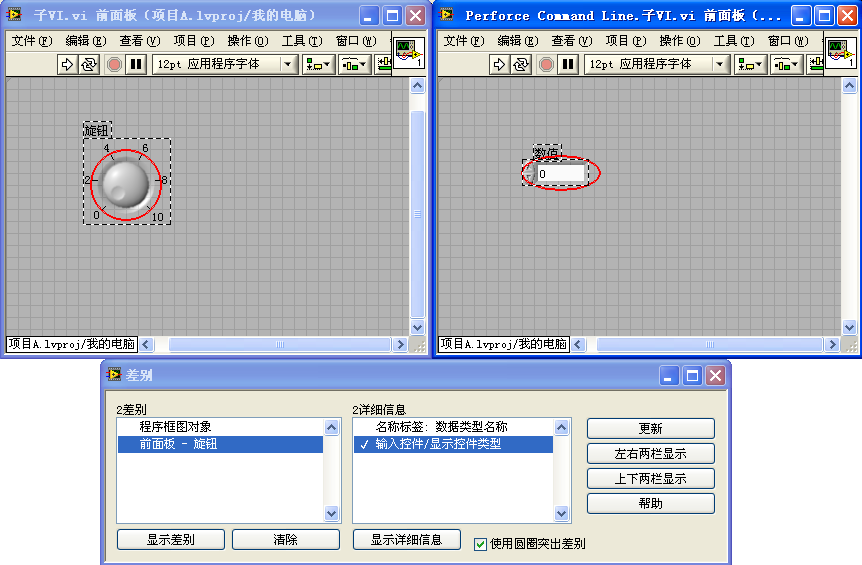
The comparison results are displayed in a text format in the "Differences" dialog box. Since representing LabVIEW code in text is not very intuitive, double-clicking on an item in the "Details" section of the differences dialog will highlight the areas of discrepancy directly on the two VIs.
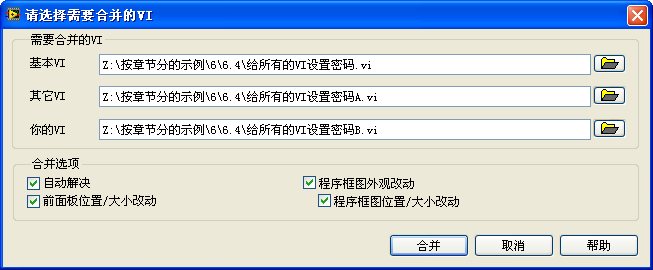
In the case of multiple developers working on a project simultaneously, it's possible for two developers to modify the same VI concurrently. If both sets of modifications are essential and cannot be discarded (assuming they are not completely redundant), LabVIEW's merge tool (available under "Tools -> Merge -> Merge VIs") can be utilized to integrate the differences between the two VIs:
Execution Environment
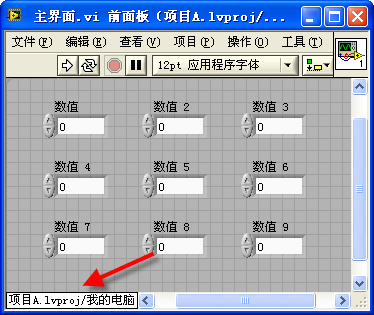
Opening a VI within a project displays the project's name and the target machine at the VI's bottom left corner:
Readers who have used versions of LabVIEW prior to 8.0 might remember that it was impossible to open two VIs with the same name but different content at the same time. This restriction makes sense because VIs act like functions in text-based programming languages, and having two functions with the same name would create ambiguity about which one should be used. However, this also introduced inconvenience. For example, if you needed to run two programs simultaneously, and their main VIs were both named "main interface.vi" — a common naming choice — despite having different codes, the system should allow for both to operate without conflict.
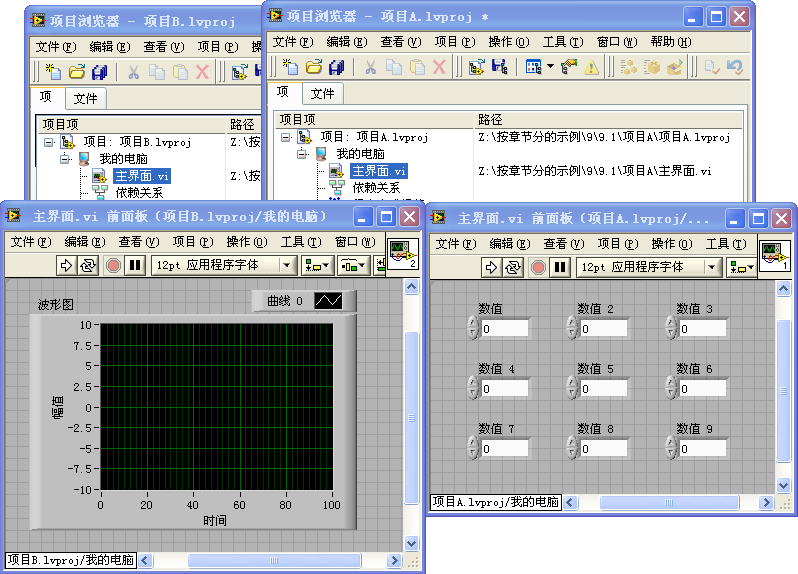
Besides facilitating file management for users, another role of projects is to provide a unique execution environment for their VIs. VIs from different execution environments do not interfere with one another, allowing for the simultaneous opening of VIs that share a name but belong to different projects:
Sometimes, within the same project, there might be a need to use VIs with identical names. For instance, in a project designed to control two different instruments, it might be necessary to have two distinct "initialize.vi" VIs to initialize each device separately. However, using two ordinary VIs with the same name directly would still cause identification issues within the program. The solution is to place them into different "libraries", as LabVIEW can differentiate between same-named VIs when they are contained in separate libraries.
Libraries
The term "library" in computer software most commonly refers to dynamic-link libraries (DLLs), which are files ending with a .DLL extension that act as a repository of functions. These DLL files contain multiple functions that other applications can call. In LabVIEW, a library signifies a VI library, denoted by an .lvlib file extension. It logically encompasses a collection of related VIs, alongside other pertinent files and configuration details.
Creating a Library
In the Project Explorer window, you can create a new library by right-clicking and selecting "New -> Library".
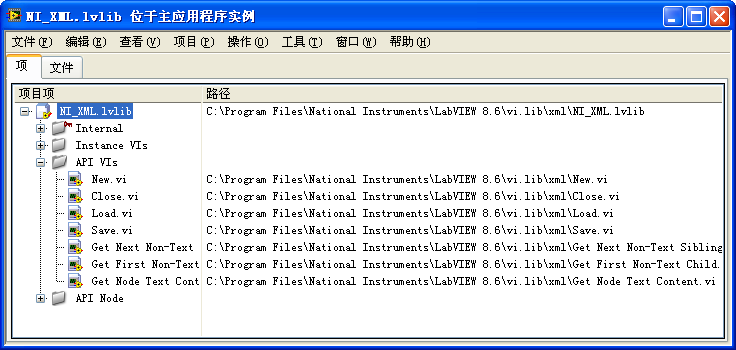
All file types that can be created within a project are also creatable within a library. For libraries containing numerous files, it's advisable to categorize these files and place them into corresponding virtual folders:
VI Namespace
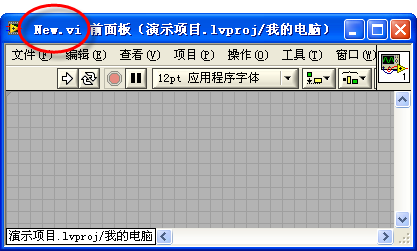
A VI not assigned to any library retains its file name as its VI name, displayed on the VI's title bar:
Upon inclusion in a library, a VI's name transforms. The name for a VI within a library comprises the library file name followed by the VI's file name. For instance, as depicted below, a VI titled "New.vi" within "NI_XML.lvlib" would adopt the VI name "NI_XML.lvlib:New.vi", with the library file name and VI file name separated by a colon:
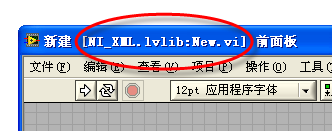
Because the VI name within a library incorporates the library name, two VIs with identical file names in different libraries will possess unique VI names. This allows LabVIEW to distinguish them by their distinct names. Even within a single project, it is feasible to have two VIs with the same file name, as long as they are part of different libraries.
Libraries can be nested; that is, one library can encompass another. In such scenarios, the VI name would carry prefixes from multiple libraries, e.g., "aaa.lvlib:bbb.lvlib:ccc.vi". However, managing multi-level libraries can lead to confusion, hence it's recommended to avoid using nested libraries.
In the image above, the VI name appears within square brackets on the VI's title bar. During VI execution, the name within the brackets is not displayed; instead, "New" appears. This occurs because the VI's properties dialog box, under the "Window Appearance" tab, has been configured to display a specific title when the VI is running. With a window title set, the VI name then appears within square brackets on the title bar.
Setting Access Permissions in VI Libraries
One of the challenges in maintaining large software projects is managing the intricate web of dependencies between modules and functions (VIs). Making alterations in one part of the program can unexpectedly affect other parts, leading to unforeseen issues.
I experienced this firsthand when I developed a module for parsing specific file formats. The users of this module were developers working on other segments within the same extensive project. This module was designed with the intention that users would only access a few interface VIs for tasks like opening files, reading data, saving, and closing, etc. However, once the module was distributed, it became challenging to enforce these usage constraints. Users identified several lower-level VIs within the module that precisely met their needs and, despite understanding the associated risks, they opted to use these VIs directly.
Subsequent updates to this module involved modifications to some of these lower-level VIs. Despite no changes being made to the interface VIs, alterations to the lower-level VIs—such as parameter changes, renaming, or even deprecation—caused issues for users who had incorporated the original VIs into their programs. When the updated module was released, there were immediate complaints from users stating that it lacked certain VIs or that modifications to the VIs had rendered their programs non-functional.
The advent of VI Libraries solved this problem. LabVIEW allows developers to define access permissions for VIs within a library, making them either public or private:
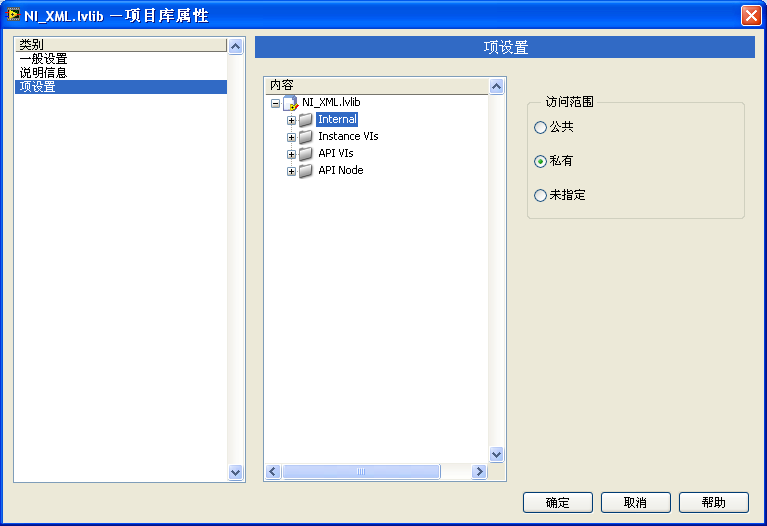
Public VIs are accessible for invocation by any other VI, whereas private VIs can only be called by other VIs within the same library. For libraries containing a large number of VIs, setting access permissions for virtual folders directly can simplify management, avoiding the need to individually adjust permissions for each VI.
In a VI library, VIs that act as interfaces should be set as public; all lower-level VIs and those not intended for external use should be marked as private. This ensures that users cannot directly utilize any lower-level VI they find within the module, regardless of its utility for their specific needs. When releasing new versions of the library, developers can freely modify the lower-level, private VIs without concern, as all private VIs within the library are guaranteed not to be externally used. Maintaining unchanged public interfaces ensures that the overall project remains stable and error-free despite updates to the module.
LLB Files
LLB files, with the .llb extension, have been a part of LabVIEW since its early versions. They are compressed files that can contain multiple VIs or other file types. Typically, when you think of creating a new file, you might go to "File -> New". However, in LabVIEW versions after 8.0, you won't find the LLB file type in the "New" menu. To create or manage an LLB file, you must first navigate to "Tools -> LLB Manager". From there, selecting "File -> New LLB" within the LLB Manager's menu allows the creation of a new LLB file. Likewise, adding or removing VIs within an LLB file also requires the LLB Manager.
From the outset, it's evident that LLB files and libraries in LabVIEW serve similar purposes as both encapsulate groups of VIs. However, they differ significantly in practice.
An LLB file physically encompasses a group of VIs. It exists on the disk as a single file, containing all its VIs internally, accessible only through the LLB Manager. Since LLB files are compressed, they can conserve disk space. However, with the exponential growth in computing storage capacities, saving space for LabVIEW programs has become less of a concern, diminishing the appeal of compressing VIs.
Conversely, a library only logically contains its group of VIs. In the Project Explorer, one can see the VIs belonging to a library, but these VIs remain as separate files on the disk, unrestrained by the library file itself.
VIs within an LLB file are not hierarchically organized; all files are stored at the same level, complicating the visualization of their call relationships in larger files. Libraries, on the other hand, allow for the creation of virtual folders to more logically organize files and their relationships.
The VI names inside an LLB file are subject to length limitations, with overly lengthy filenames being automatically truncated.
As a single file, LLBs are not conducive to source code control. Modifying any VI within an LLB marks the entire LLB file as modified, which is problematic for incremental storage and makes pinpointing the changed VI difficult.
Despite these drawbacks, many of LabVIEW's built-in functions, modules, and examples continue to be provided in LLB format due to historical reasons. This status quo is unlikely to see a significant shift in the short term. However, considering the outlined disadvantages of LLB files, it is recommended to avoid them in new LabVIEW projects, opting instead for libraries to exploit their superior organizational and module management advantages.