Publishing Products
After the development phase of LabVIEW software concludes, there are several common methods to distribute the software to end-users. One approach involves directly providing the source files, namely the VIs used during development, to users. Users can then execute these VIs within the LabVIEW environment. Alternatively, for users without the LabVIEW development system, the software can be compiled into an executable (EXE) file, allowing users to run the software by simply double-clicking the EXE file.
The tools for distributing LabVIEW software to users are integrated within the Project Explorer. The "Build Specifications" section in Project Explorer is designated for configuring how the project will be released. By right-clicking on the build specification menu and selecting "New", various distribution methods are available, including Application (EXE), Installer, Shared Library (DLL), Source Distribution, Web Service, and ZIP File.
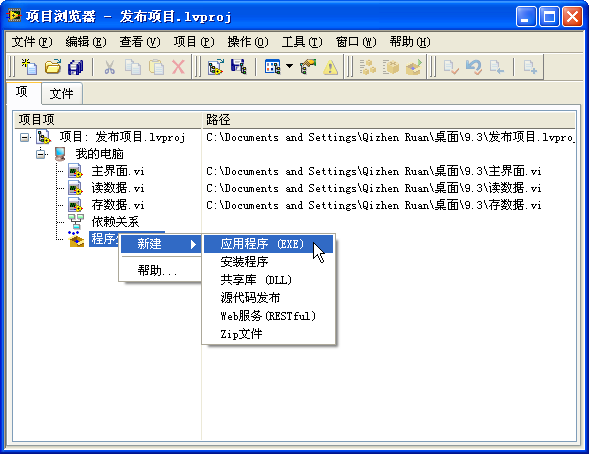
Application
Application Build Specifications
Choosing "New -> Application" from the build specification menu will open the application build specification's properties dialog as shown below. The "Application" build specification is designed for generating an executable (EXE) file. If a project has a principal VI (typically the program's main interface), with all other VIs being its subVIs, then designating the main VI as the startup VI on the Source Files tab of the application's properties dialog is all that's needed. LabVIEW will automatically bundle all subVIs that the main VI statically calls into the EXE file.
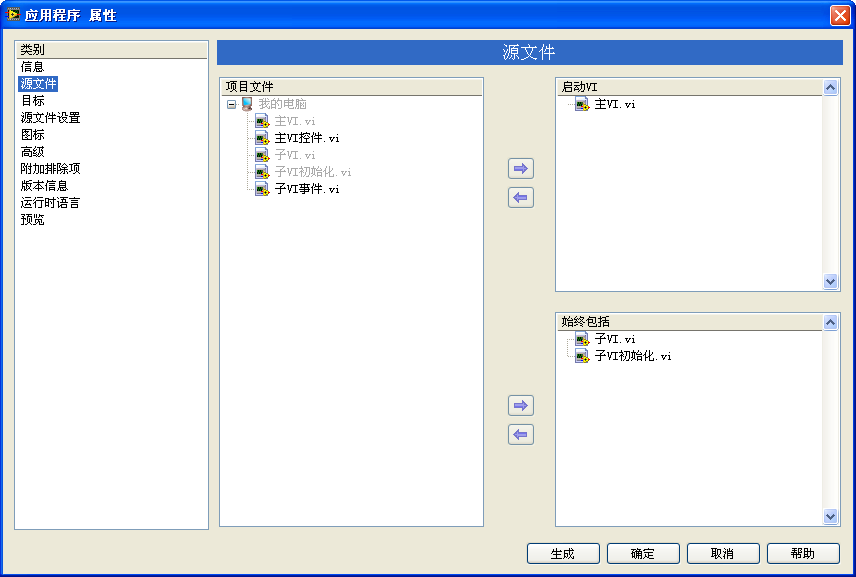
For projects containing dynamically called subVIs, LabVIEW does not automatically include these subVIs in the EXE file. Developers are required to manually add these VIs to the "Always Included" file list within the project to ensure they are compiled into the final executable.
File Path Changes
When a program involves dynamic VI calls or file read/write operations, it inevitably includes path information for these files or VIs. Converting such a program into an executable can alter the locations and the specified path constants. This discrepancy leads to a potential issue: a program running perfectly in the development environment might not execute properly once compiled into an executable.
Consider the program depicted above as an example. Its function is to open a "Data.ini" file located in the same directory as the current VI. However, after compiling this project into an executable file and running it, you may find that "Data.ini" is not successfully accessed. To investigate the issue, modify the program to display the paths of the current VI and the "Data.ini" file on its interface:
For comparison, let's say the VI folder in the development environment is placed under C:\9.3\, and the compiled application named TestDir.exe is placed in C:\9.3\Application\:
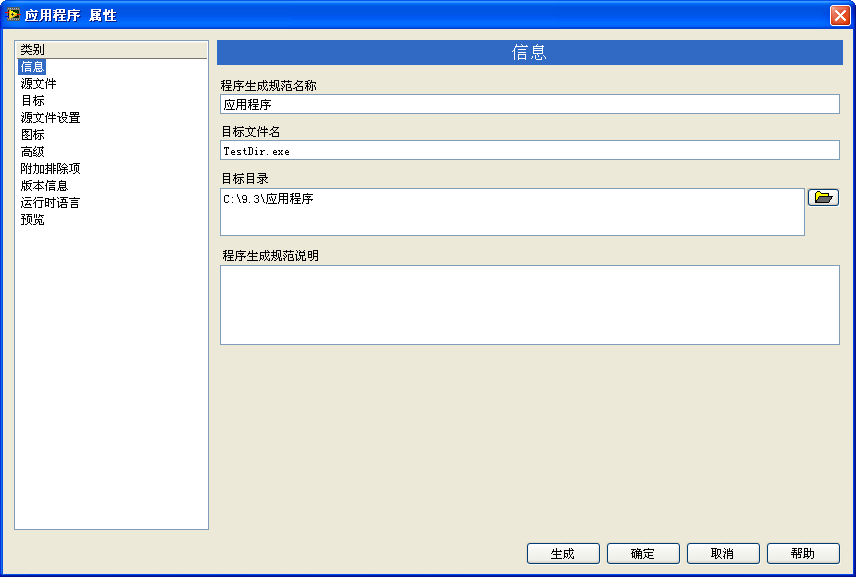
Observing the paths displayed when running the VI directly in the development environment and the executable file generated from the VI reveals a significant insight:
In the development environment, running the VI displays its true path, with the data file in the same folder. However, after compiling into an executable, the VI file essentially vanishes, leaving behind a fictitious VI path suggesting it lies beneath the exe file. If we consider the exe file as a "folder", then the VI would be inside this virtual folder. Despite the data file appearing to be at the same level as the VI, it's clear that the actual data file can't be inside the EXE. Hence, the path derived using the relative path is incorrect.
There are two ways to solve this problem:
During program development, always place the main VI in a specific subfolder, like
C:\9.3\MyApp\, and locate the data file in a parallel path, such asC:\9.3\. In this setup, the relative path saved in the program for the data file is..\..\data.ini. After the program is compiled into an executable, the data file and EXE file reside in the same path, keeping the relative path accurate.Another more flexible solution involves determining if the VI is running within the development environment or as an executable file, and using different methods for path calculation accordingly. In the example provided, the goal is for the data file to be located in the same folder as the executable file. Thus, obtaining the path one level up from the VI is sufficient:
To discern the current runtime environment, use the "Application" property node's "Kind" property. If its value is "Run Time System", it indicates the executable file is currently running. It's worth noting that in the development environment, VIs within the same project might be in different subfolders with multiple levels. However, once compiled into an executable file, all VIs are treated as if they're in the same directory level — essentially within a "folder" created by the executable file. The paths for all VIs will look something like C:\xxx\xxxx.exe\xxx.vi.
A simpler approach is to place all data files in the directory one level above the VI. This way, no special adjustments are needed; after the executable file is generated, the data files will naturally be located in the executable file's folder.
LabVIEW automatically generates an INI file named after the executable upon running. Any configuration information required by the program can be stored in this INI file, eliminating the need for an additional INI file. Since the name of the executable can change, the program should dynamically determine the INI file's name based on the executable's current name. The "Application -> Current VI's Path" and "Application -> Name" property nodes can be used to obtain the current executable file's path and name:
LabVIEW features a path constant known as the "'VI Library' Path Constant" . It's often utilized to locate the LabVIEW development environment's path. For instance, if the program needs to access information from the "LabVIEW.ini" file, the method shown below can be used to find that file's path:
In the LabVIEW development environment, the 'VI Library' path constant points to the vi.lib folder's path under the current LabVIEW installation. However, after being compiled into an executable file, the executable runs independently of the LabVIEW development environment. Therefore, the program cannot ascertain if LabVIEW is installed on the computer or its location. The "VI Library" path constant will return a null value.
Typically, after being compiled into an executable file, the program should no longer depend on any files specific to the LabVIEW development environment. If it is crucial for the program to identify the LabVIEW development environment's folder, this information can be retrieved by reading the registry. The LabVIEW installation information is stored under a fixed registry key.
Other Settings
For professional applications, creating an appealing icon and specifying version information are essential steps. These settings, along with others, can be configured within the application build specification. Their usage is straightforward, so this guide won't cover them in detail.
Before finalizing the application, you can preview the build specification's settings on its "Preview" page. This page displays all the files that will be generated, along with their paths, allowing developers to verify the accuracy of the build configuration, such as correct source files and paths, before generating numerous files.
Shared Libraries
Sometimes, programs developed in LabVIEW are not interactive applications but functions meant to be called by other non-LabVIEW programs. In these scenarios, converting LabVIEW project VIs into a DLL, with each necessary VI becoming an exported function within the DLL, is a common practice.
Choosing "New -> Shared Library" in the application build specification menu opens a dialog where you can set up the shared library. Unlike generating an executable, which only requires identifying the main VI, creating a shared library involves specifying each VI to be exported within the DLL in the "Exported VIs" section.
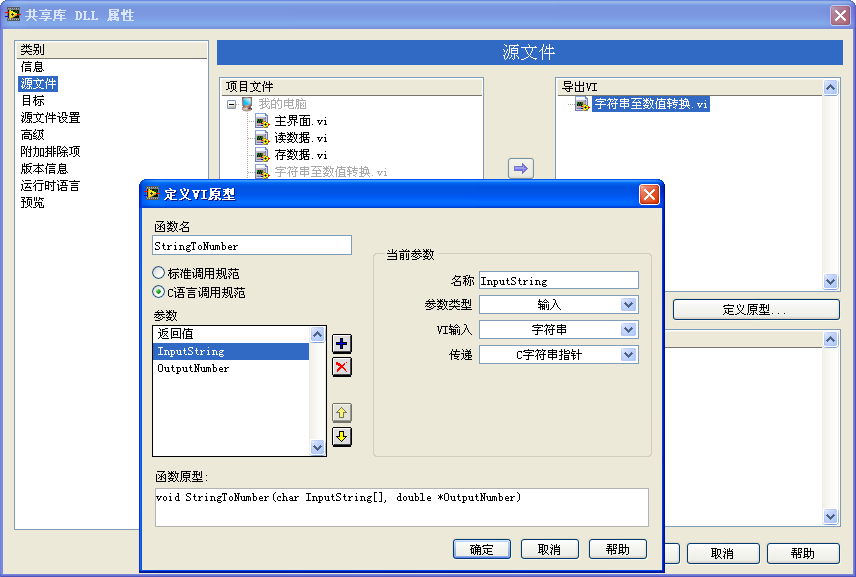
To add a VI to "Exported VIs" or to configure an export VI's (function's) properties, use the "Define prototype" button. This opens the "Define VI Prototype" box for detailed configuration. Transforming a VI into a DLL function may necessitate manual adjustments, such as renaming the VI with English characters if it contains names with illegal characters for functions. Similarly, the names of parameters within the function might require adjustments.
The data types in DLL functions differ from VI control data types. For instance, strings in VIs include length information, while DLL functions typically use char* type for strings without inherent length data. Passing strings in DLL functions usually requires an additional parameter for the string length.
LabVIEW generates accompanying .h and .lib files with the DLL for other programs to use. If a VI needs to be an exported function in a DLL, it's advisable to use basic data types like strings and numeric types. Using complex types like clusters in VIs results in special LabVIEW data types in the DLL functions, defined as "TD1", "TD2", etc., structures. Managing these types in textual languages can be challenging without specific C interface API functions provided by LabVIEW. To simplify the use of LabVIEW-generated DLLs, it's recommended to use simple data types for function parameters.
Source Code Distribution
Distributing Source Code
Developers sometimes provide their programs directly to users in VI format. For instance, many LabVIEW toolkits are delivered as VIs. However, VIs intended for customer use often differ from those used during development, with common modifications including password protection to safeguard intellectual property and disabling debug features to enhance performance. LabVIEW's source code distribution feature facilitates these adjustments with ease.
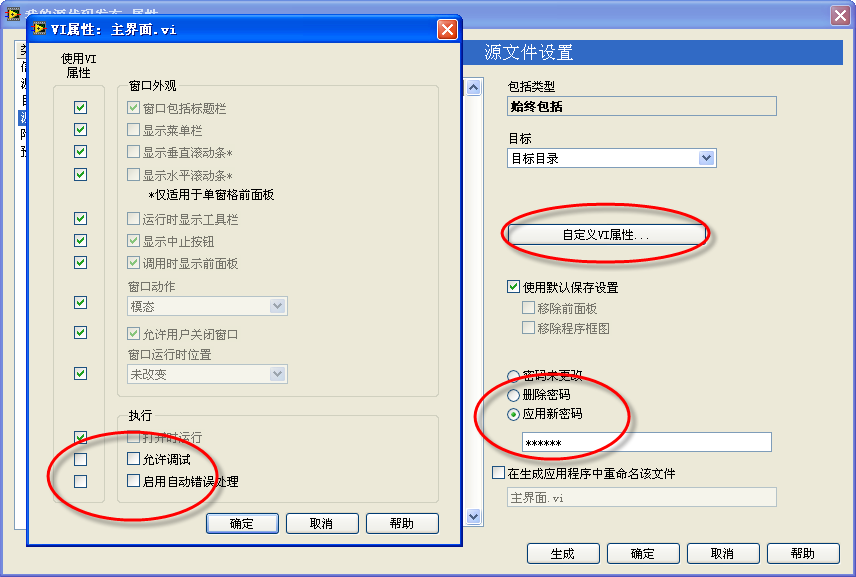
To use this feature, in the application build specification within LabVIEW, select "New -> Source Distribution". Its setup resembles that for creating a shared library, requiring developers to specify which VIs will be included in the distribution package. Unlike creating executable files, source distribution directly offers VIs to users without changing parameter types. However, "Source File Settings" needs to be configured for distributed VIs. By selecting a VI in the project file list, you can set a password or alter its release file name on this page. Additional properties can be adjusted in the dialog box that pops up after clicking "Customize VI Properties". By default, the properties of the distributed VIs remain unchanged from the original VIs. Any desired changes can be made by adjusting the relevant checkboxes.
To improve the efficiency of VIs distributed to users and to protect the block diagram from being viewed, you can opt to remove the VI's block diagram and front panel. In versions of LabVIEW up to 7.1, such modifications could be made through the "File -> Save As..." menu option. From LabVIEW 8 onwards, these settings have been incorporated into the source code distribution build specification. It’s important to note that only sub-VIs that never display an interface should have their front panel removed. VIs with their block diagrams removed are restricted to operating within the specific LabVIEW version they were modified in. For instance, a VI modified in LabVIEW 8.5 will only function in LabVIEW 8.5, and not in LabVIEW 8.6 or other versions. Thus, if there's a need for the distributed VI to be compatible with future LabVIEW versions, it’s advisable to password-protect the VI rather than removing the block diagram, even if protecting the diagram is essential.
When generating an executable file, the "Startup VIs" section can include multiple VIs, allowing the executable to open multiple VI panels simultaneously upon launch.
Editing the Control and Function Palettes
VIs intended for source code release are usually sub-VIs designed for user programming. To make these VIs easily accessible during programming, you can add them to the Function Palette.
There are two methods to add a VI to the Function Palette:
The first method is automatic. Placing a VI in the [LabVIEW]\user.lib directory automatically displays it in the "User Libraries" section of the Function Palette, allowing users to select it during programming. LabVIEW ignores files and folders in the user.lib directory that start with an underscore, meaning they won't be added to the Function Palette.
The second method is manual and involves adding a VI directly to the Function Palette. This can be done by navigating to "Tools -> Advanced -> Edit Palette". This action opens three dialog boxes: the Controls Palette, the Function Palette, and the "Edit Controls and Functions Palettes" dialog box, which is used for editing. At this point, the Controls and Function Palettes are in editing mode. Right-clicking on an icon or blank space within the palette will open an editing menu.
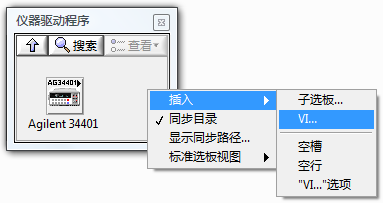
To add a VI to a specific location on the Function Palette, choose "Insert -> VI" from the right-click menu. In the "Select VI or Directory to Add" dialog box that pops up, enter the full path of the VI, and it will be added to the Function Palette:
After finishing the edits on the Function Palette, click "Save Changes" on the "Edit Controls and Functions Palettes" dialog box. LabVIEW will then confirm the impending changes.
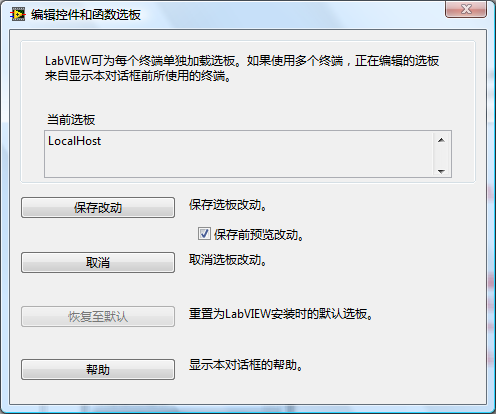
The settings for each sub-palette within the controls and functions palettes are stored in .mnu files. By clicking "Continue", the recent edits will take effect. When programming, you can now select the VI that was just added from the function palette.
Typically, dragging an icon from the controls or functions palette onto the front panel or block diagram adds a control, function, sub-VI, or other node to the block diagram. However, certain icons from the palette can add multiple objects or even an entire code snippet to the block diagram or front panel. For instance, selecting "Express -> Execution Control -> While Loop" from the function palette adds a While Loop to the block diagram and a "Stop" button control to the front panel, which controls the loop's termination condition.
To enable this functionality, first create a VI that includes all the components—block diagram code and controls—you wish to place on the target VI. For example, to mimic the "Express -> Execution Control -> While Loop" functionality, create a VI with a While Loop and a "Stop" button control for its termination condition. Save this VI as "MyWhile.vi". Next, manually add this VI to the function palette. Before finalizing the changes, right-click on this VI within the palette and select "Place VI Contents", then confirm the changes.
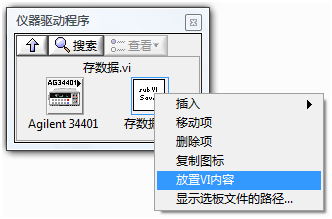
Moving forward, when you drag this VI from the function palette onto the block diagram, it won't place "MyWhile.vi" as a sub-VI. Instead, it will directly transfer the contents of "MyWhile.vi" into the target VI, effectively adding a new While Loop and a "Stop" button.
In the Common Program Structure Patterns chapter of this book, several frequently used programming structure patterns are discussed, such as the Event Loop and State Machine. You could create template VIs for these structures and insert them into the function palette as "Place VI Contents". This way, when programming, selecting icons for these structure patterns from the function palette will directly incorporate these patterns into the current VI.
Web Applications
Remote Front Panels
Sometimes, operators need to control programs that are running on computers located remotely. For example, a program running on a computer in a production workshop might be reading data directly from sensors on machinery; meanwhile, monitoring staff in a separate office need to observe the data being collected in real-time and respond promptly to any abnormalities. There are several methods to address such scenarios. The traditional approach involves writing separate programs for the computers in both the office and the workshop, which communicate data between each other using protocols like TCP/IP. This approach can be quite cumbersome to develop. Fortunately, LabVIEW provides several straightforward methods that easily enable control over programs on remote computers and access to the data these programs collect. The underlying principle of these methods is similar; they all involve setting up a web service on the computer that runs the program or performs tasks. Remote computers access data or control the VI through this web service.
If both computers are equipped with the same version of LabVIEW, the most convenient method for remote access and control is using the Remote Front Panel feature.
To utilize the Remote Front Panel, first, you need to activate the web server function on the computer (server-side) that is running the VI: select "Tools -> Options" from the LabVIEW menu, and in the "Web Server: Configuration" page, check "Enable Web Server". Then, open the VI that needs to be remotely accessed (it can be opened without being run).
On the computer attempting remote access (the client side), open LabVIEW and select the menu item "Operate -> Connect to Remote Front Panel".
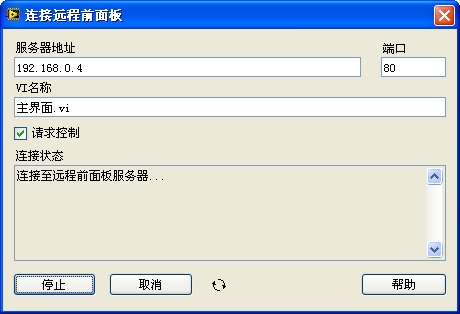
In the dialogue box that appears for connecting to the remote front panel, input the IP address of the computer with the web service enabled and the name of the VI you wish to access. If you only intend to observe the VI’s operation results, it's not necessary to check "Request Control". Then click the "Connect" button to establish a connection to the VI's front panel on the server.
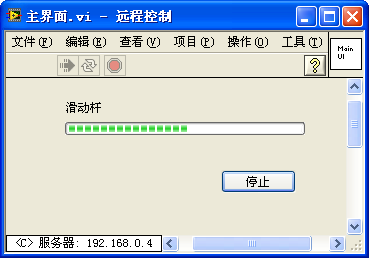
After a successful connection, the front panel of the VI on the web server will appear, allowing you to control its operations and observe the outcomes:
On the web server side, you can manage remote front panel connections through the menu "Tools -> Remote Front Panel Manager".
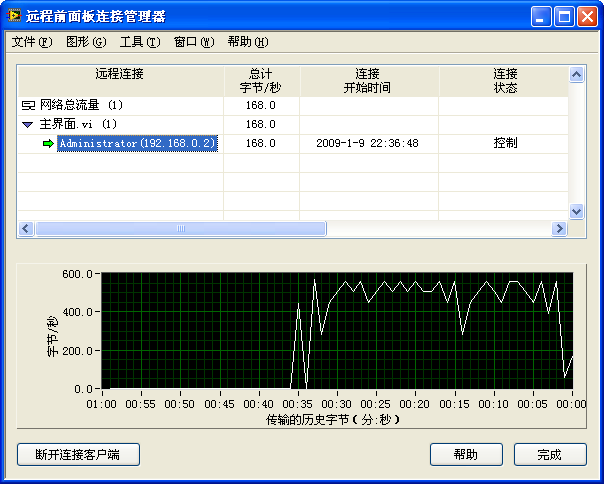
As shown in the figure, this server's "Main Interface.vi" is currently being remotely accessed by a machine with the IP address 192.168.0.2. To disconnect a particular remote front panel, simply click the "Disconnect Client" button.
Web Publishing
Using remote front panels has one drawback: both the server and client machines need to have the same version of LabVIEW installed. This requirement limits its applicability. Clients don't necessarily need full access to the LabVIEW development environment for many applications. LabVIEW offers a more universal solution through its web publishing feature, allowing computers to view and control VIs running on another machine as easily as browsing a website.
On the computer running the VI (the server), go to the LabVIEW menu and select "Tools -> Web Publishing Tool".
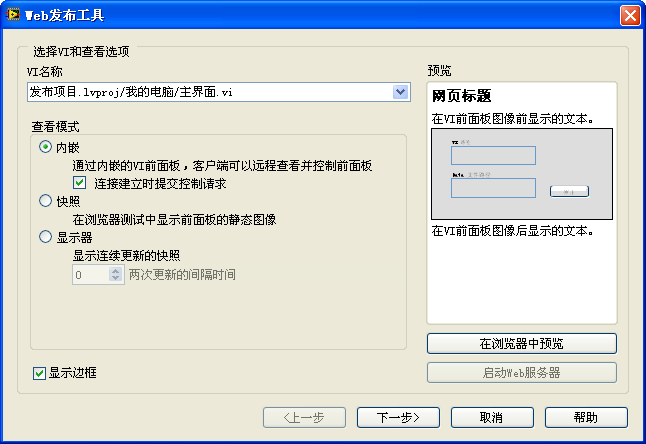
This launches the web publishing tool's configuration dialog, where you select the VI you wish to publish and activate the web server. Follow the step-by-step process to generate a web-published VI.
LabVIEW will create an HTML file for the VI and place it in the web server's root directory. By default, the web server's root directory is [LabVIEW]\www.
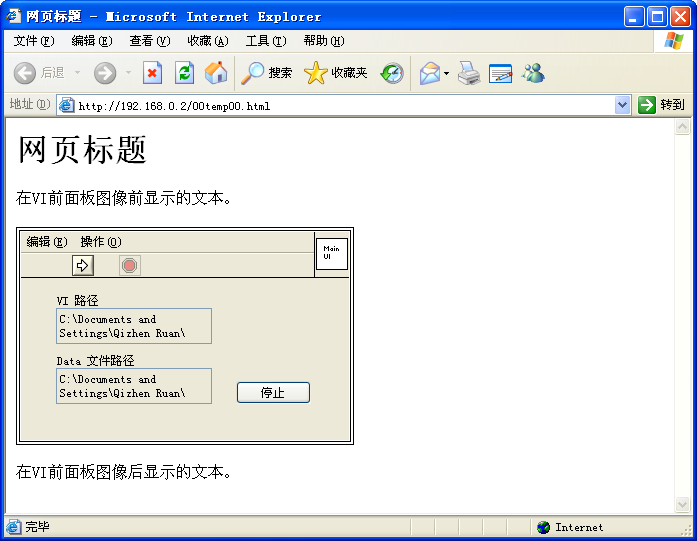
Computers on the network can open a web browser, enter the web server computer's name or IP address, and navigate to LabVIEW's web service page. To access and control the VI you've selected for web publishing, load it into memory on the web server computer. Then, on a remote computer, type the web server's IP address followed by the slash and the name of the generated HTML file into the browser's address bar:
Web Services
Web services and web publishing serve similar yet distinct functions. While web publishing provides a full application with a user interface for remote access, web services offer specific VI functionalities without an entire application. This approach allows applications on client machines to utilize functionalities hosted on a server.
The functions provided by web services are executed on the server. When using a web service, the client machine sends the function call and necessary parameters to the server, which processes them and returns the results back to the client.
To create a web service, select "New -> Web Service" from the project build specifications menu. In the properties dialog box, under the source files page, you can configure the VIs that will become part of the web service.
Installation Programs
After creating applications and shared libraries, they might not be ready for immediate use on other computers. Programs generated by LabVIEW rely on the LabVIEW runtime engine, which might not be installed on many computers. Professional software typically comes with an installer package to assist users in correctly placing each component on the target machine, creating start menu entries, and writing registry information, among other tasks.
For creating complex installation software, professional installation package creation tools are necessary. However, for basic tasks such as creating startup items or adding an uninstallation entry in "Add or Remove Programs", LabVIEW's application build specifications suffice.
Choose "New -> Installer" in LabVIEW's application build specifications. In the "Source Files" page of the properties dialog box, select the files that need to be installed on the target machine:
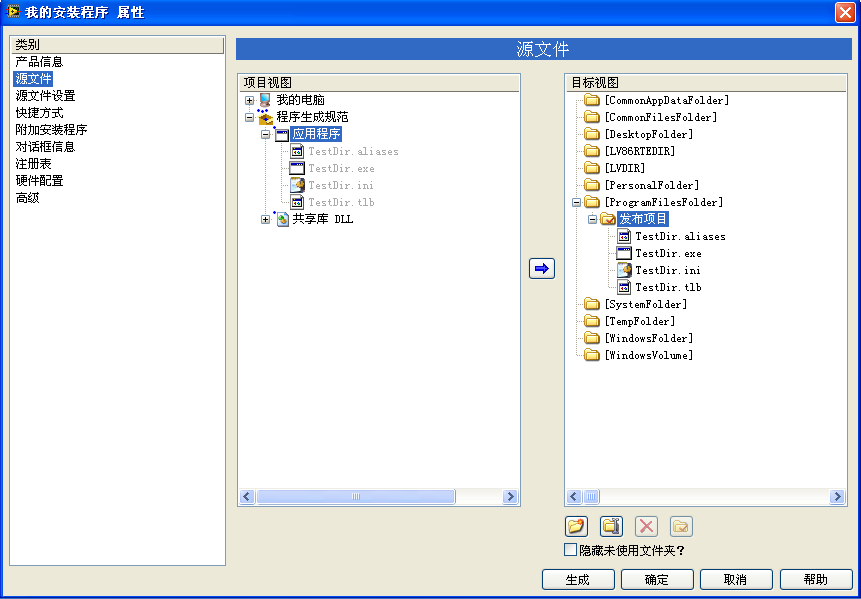
Typically, you might need to install generated applications, shared libraries, source codes, or web services, rather than just a VI from the project. Therefore, you can also select other files generated by the project's build specifications. Because LabVIEW programs depend on the LabVIEW runtime engine for execution, include the necessary engine and other components in "Additional Installers":
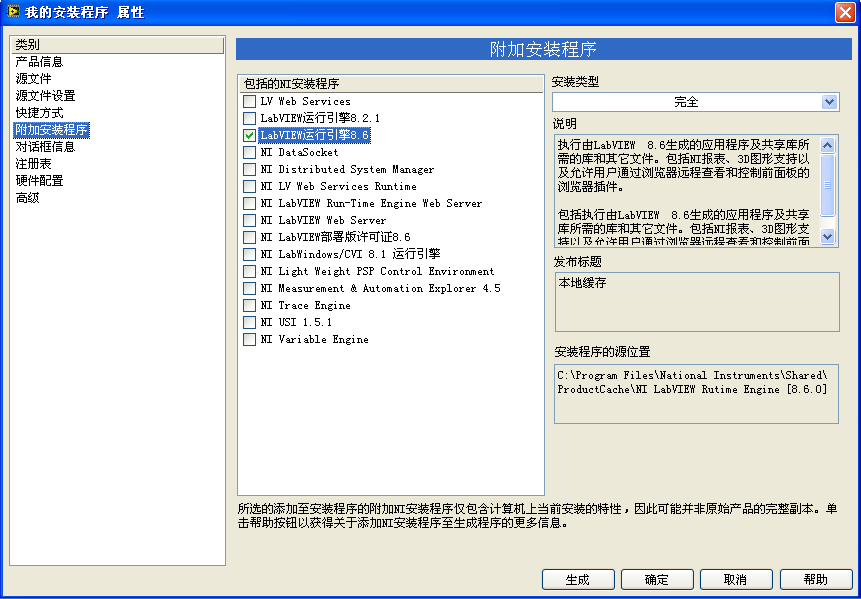
The LabVIEW engine is quite sizable, possibly adding tens of megabytes to your installer package. In cases where the program itself is very small, carrying an additional component significantly larger may not seem efficient. Hence, if the target machine is guaranteed to have the required components, excluding the runtime engine from the installation package is a viable option.
Zip Package
The popularity of green software, which forgoes traditional installers in favor of directly packaging all necessary files into a zip file, is evident online. LabVIEW offers this functionality as well. To create a zip package in the build specifications, simply add the required files to the zip package accordingly.
Packaging Libraries
Many engineers familiar with LabVIEW have also worked with Visual Studio, a development tool known for allowing users to create a Solution for a software product, which can include multiple Projects. This software might consist of several components, such as an executable (EXE) and two Dynamic Link Libraries (DLLs), for which three distinct Projects can be established. Each Project has its own independent source code and compilation settings, facilitating modular development. Projects can be interdependent, allowing, for example, the automatic compilation of two DLLs when compiling the EXE.
The concept of "Project" in LabVIEW, a relatively recent addition, lacks the maturity of Visual Studio's functionalities. In LabVIEW, there's only the Project level without the Solution level. This limitation can be cumbersome for large-scale developments: all VIs must reside within a single Project, leading to a bulky EXE file and time-consuming compilation processes. The challenge of segregating independently developable modules, with all code intermingled, complicates separate development further.
Some companies opt to release their products not as executables but as libraries for use by other programs. Releasing a functional module as VIs necessitates including these source VIs directly within the user's project, which may be impractical; conversely, releasing them as DLL files poses challenges due to the cumbersome process of calling DLLs within LabVIEW.
This challenge remained largely unaddressed until the introduction of LabVIEW 2010, which brought about the new file format: Packed Project Libraries (file extension: lvlibp). This format merges some benefits of the traditional library files (lvlib) with those of LLB file formats, making it an attractive option for modular programming.
A Packed Library, as the name suggests, is essentially a packaged library file. Libraries are designed by programmers during the developmental phase. For instance, the project depicted below features a library named "My Algorithm Library.lvlib", containing two VIs, one of which is private.
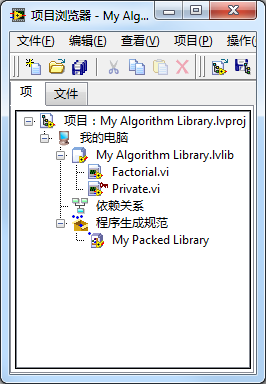
Contrastingly, a packed library is derived from a library via a project's build specification. In the above example, right-clicking "Build Specifications" and selecting a new "Packed Library" type of build specification directs the compilation of "My Algorithm Library.lvlib" into a packed library:
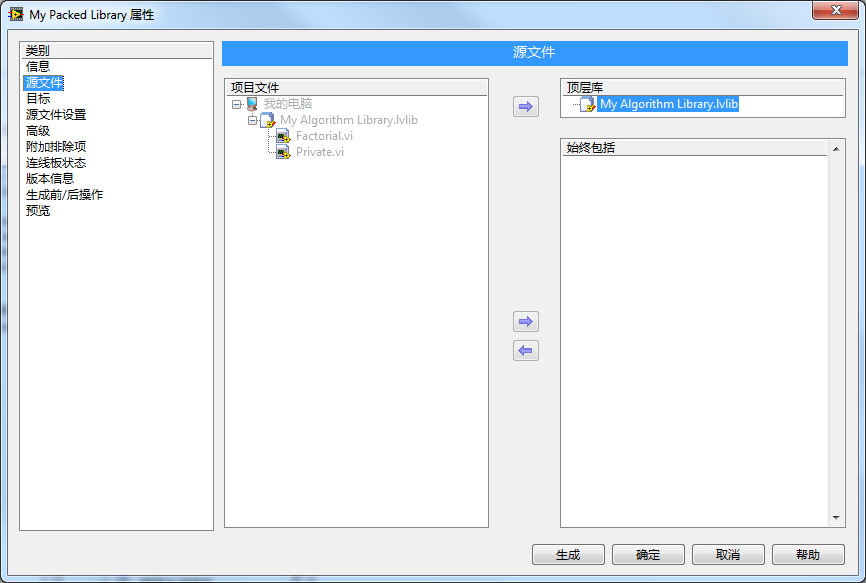
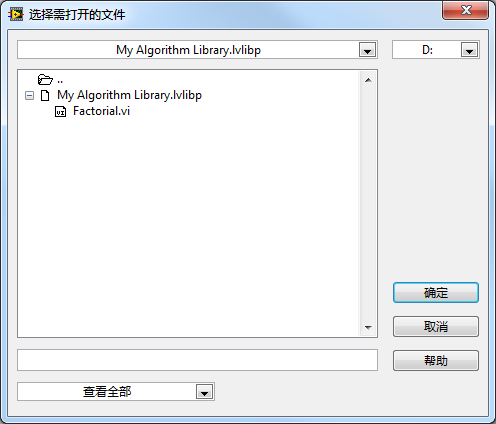
The compilation results in a file named "My Algorithm Library.lvlibp" being created in the specified location. This file extension is similar to that of a library file but includes an additional 'p' at the end.
Double-clicking on this file allows you to open it and view the public VIs it contains:
If you want to use this packed library in another project, you can directly add it to the new project. The following image shows a demonstration project utilizing the packed library:
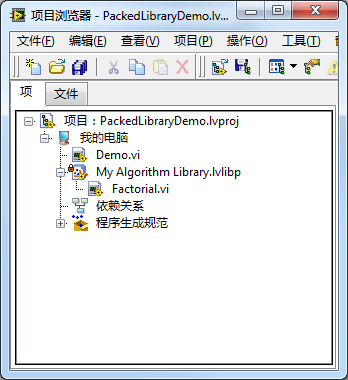
From the user's perspective, a packed library seems very similar to a library, with an identical method of use.
Packed Library vs. Library:
- Both serve as methods to encapsulate a group of functionally related VIs.
- Libraries can have a hierarchical structure for their contained VIs.
- VIs in both libraries include namespaces, characterized by the library name with its extension.
- Both can be easily utilized within the project manager.
However, despite these similarities, packed libraries and libraries differ in several significant ways:
- Packed libraries are generated through a compilation process.
- The VIs within a packed library are outcomes of this compilation and are not editable.
- Packed libraries contain private VIs that are hidden from and inaccessible to the user.
- Packed libraries bundle VIs, .lvlib files, and other utilized resources into a single compressed file, visible on disk as a solitary .lvlibp file, with individual VI files hidden from view.
- Ideally suited for releasing to users as final products, packed libraries offer a streamlined distribution format.
- Incorporating packed libraries into projects can lead to shorter compilation times, as the VIs within are already compiled and do not require recompilation. This efficiency requires that the packed library and the project utilizing it are compiled with the same LabVIEW version.